
4 Easy Ways to Speed Up Cycles
How to speed up Cycles? This article from iRender today will give you an answer to the question. Let’s get started!
1. Switch to GPU rendering to speed up Cycles
This may sound like an obvious tip to some of you, but a lot of users aren’t aware just how much faster GPU rendering is.
Take this scene for example:
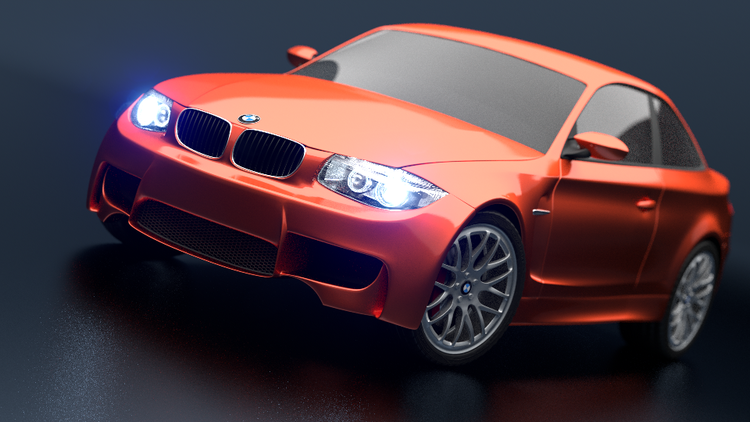
On a CPU it renders in 9 minutes 34 seconds.
On a GPU it renders in 46 seconds.
Simply by changing one setting you can improve your render times by x12! It’s the single best thing you can do to improve your render times.
To enable GPU rendering, go to File>User Preferences>System and under Compute Device, check CUDA. Then in the render panel, you will have the option to change the device to GPU (screenshot).
NOTE: GPU rendering is currently only possible on Nvidia graphics cards. Support for AMD cards has been put on hold due to driver and hardware limitations.

2. Reduce the number of bounces
The second way to speed up Cycles is to reduce the number of bounces. Comparison of Bounce settings in Cycles
One of the biggest reasons Cycles takes so long to render is because it calculates light bounces.
What are light bounces you ask? Light bounces are indirect light that bounces off walls and other objects. It’s what makes the scene look so good in comparison to the Internal renderer.
However, this realism comes at the price of render times.
By default, the maximum amount of Light Bounces is set to 8. Which is far too high in my opinion. I use Cycles a lot, and I rarely need more than 4 bounces for adequate realism.
To change the number of bounces, go to the render panel and under Light Paths, you’ll find Bounces (screenshot). Set the Min to 0 and Max to a low setting. Experiment with the setting till you find a value that achieves a good amount of realism, but without sacrificing too much in render times.
For even more fine-tuning, you can adjust the number of bounces for individual light path types like diffuse, transmission, and glossy. In the example above, I would set the Transmission amount higher than others as it is the most noticeable when reduced.
3. Change the Tile Size
Another awesome, yet relatively unknown way of reducing render times and speed up Cycles, is to change the “Tile Size”.
What are Tiles? Tiles are those little boxes that appear on your screen while blender is rendering.

Tiles are awesome because it allows the processor to focus on a smaller portion of the scene and save memory, thus reducing crashes.
Blender always had the ability to change the number of tiles, but recently a code change made it so you can change the exact tile dimensions:
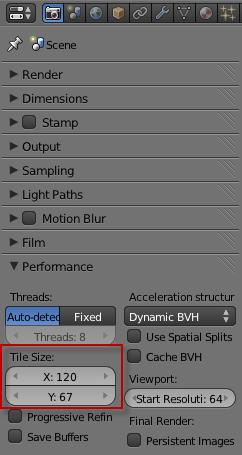
Tiles are no longer defined by their count, but by their size in pixels. This was introduced because certain sizes render faster than others. (If you don’t have Tile Sizes, download the latest trunk version of Blender.)
I conducted some studies using this scene, and came to these results:
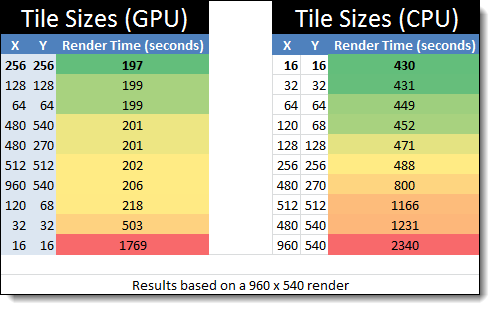
Interestingly, the fastest render time for CPU is the slowest on the GPU. This due to the GPU only being able to render one tile at a time, so it doesn’t benefit from more tiles.
In summary, the optimal tile size for GPU is 256 x 256. For CPU it’s 16 x 16. And if those don’t work for you, try to keep it in the power of 2s (eg. 128, 256, 512, 1024), as the processor handles these faster.
4. Reduce Your Samples
Put this one in the “duh” category, since most people already know it. But samples are the biggest time sucker of all, so I need to mention it.
What are the Samples? Samples are the noise that appears as your scene is rendering. In the render panel, you define the number of samples, and then blender stops once it reaches it. The more samples, the clearer, but longer your render is.
More samples are generally good. But there comes a point where more samples do almost nothing.
Take these two examples:
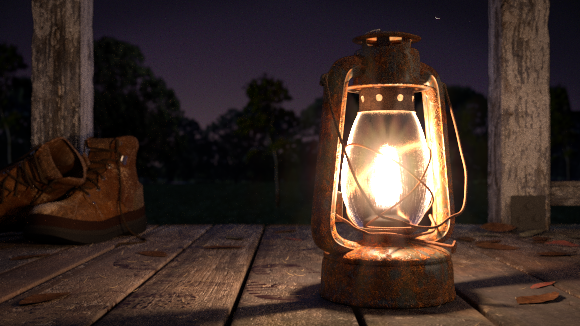
Did you really need those extra 3000 samples? Unless you’re a pixel scientist (I’m sure the job exists somewhere) you probably wouldn’t have noticed much of a difference. And if you did, you could always put the render through photoshop to clear up any remaining noise.
If you’re only rendering a still, an extra 12 minutes probably isn’t anything to stress over if it’s for the final render. But if you’re rendering an animation? Well, those frames will add up very quickly.
Moral of the story: Don’t go overboard on the samples, because the audience probably won’t notice anyway. Experiment and see how few samples you can get away with.
blenderguru.com
Related Posts
The latest creative news from Blender Cloud Rendering, Redshift Cloud Rendering, Houdini Cloud Rendering , Octane Cloud Rendering, 3D VFX Plugins & Cloud Rendering.

